3. Organization Users
We recognize allowing different users to help manage your organization's planner is important to any size of organization.
This tutorial is meant to help you understand the options available to you regarding user permissions for your organization.
To edit users for your organization, login and go to your "Modify Account" section.
You will see a list of your organizations in a box in the panel.
Locate the organization for which you'd like to manage users and click the user icon with the gear.
A dialog will appear listing the existing users for the organization.
Adding a User:
To add a user to your organization, click the "Add User" button at the bottom.
You will be presented with the following dialog. We will discuss the options listed here.
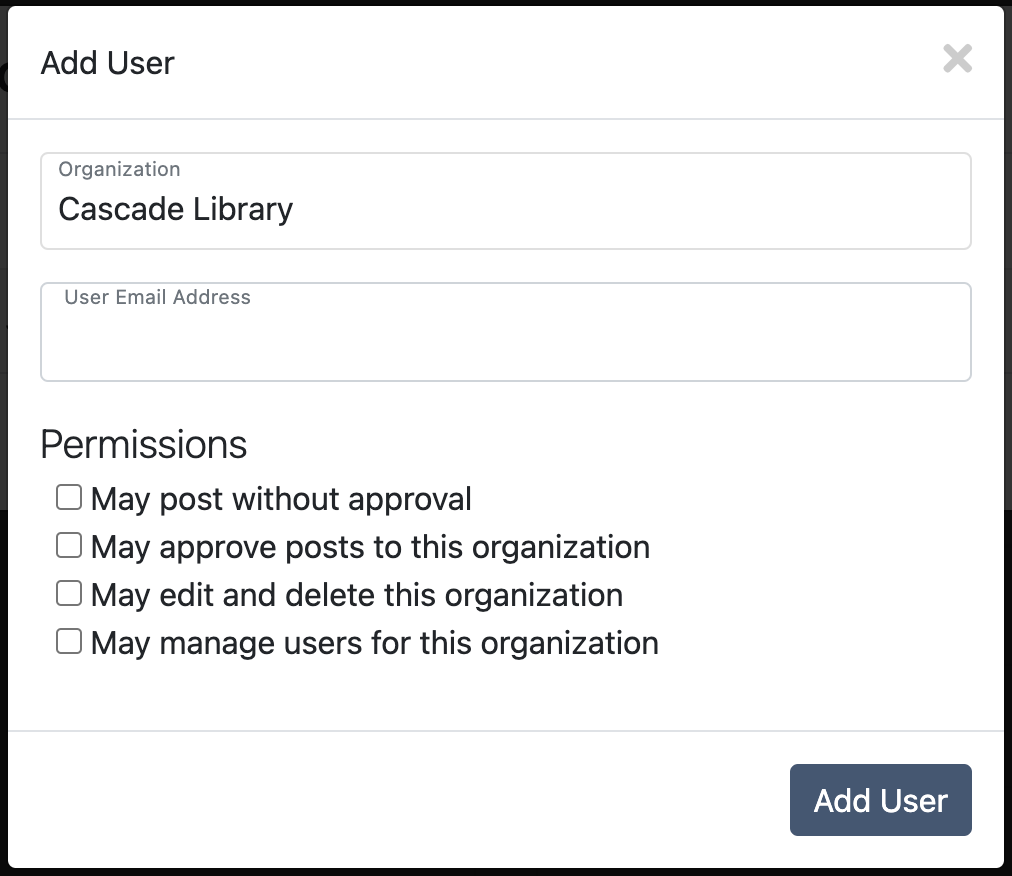
User Email Address: This is the account email address of the user you'd like to add. This field is required. We will notify the user you list here that they have been added to your organization.
May post without approval: This gives this user permission to post to this organization without approval. If you'd like to approve posts by all users, we recommend activating the "Allow public posts" for the organization.
May approve posts to this organization: This option will add this user to the emails that are sent when a user without posting permissions attempts to post to your organization planner. This user will be able to see and approve posts for your organization's planner.
May edit and delete this organization: Use this option with caution! A user with these permissions can delete your organization.
May manage users for this organization: This option allows this user to add, remove, or edit user permissions for this organization
Once you have confirmed the user and their permissions, click the "Add User" button to add them to this organization.
Editing a User's Permissions
Locate the organization for which you'd like to manage users and click the user icon with the gear.
A dialog will appear listing the existing users for the organization.
In this dialog, you will see green check marks and red ban signs indicating permissions for each user per permission. You may simply click these icons to toggle the permission on or off.
Removing a user from your organization
Locate the organization for which you'd like to manage users and click the user icon with the gear.
A dialog will appear listing the existing users for the organization.
In this dialog you may click the trash can icon next to any user you'd like to remove from your organization.
Changing ownership of your organization
Only the current owner or Locals Planner help desk is able to change the ownership of an organization.
If you are the current owner, Locate the organization for which you'd like to change the owner and click the user icon with the gear.
A dialog will appear listing the existing users for the organization.
Locate the user you'd like to be the new owner and click the crowned user icon next to their name to transfer ownership to them.
You can not undo this. If ownership needs to be transferred, the new owner will need to transfer it.